Sunday 30 October 2016

How to make a feature from an old ladder.

Our Dining area is narrow and long. It's open plan, sharing space with the kitchen. It also opens out onto our deck and garden. It's a light space with white walls and black flooring. I like the space, it's the hub of our home, but I felt it was missing some kind of focal point. When you have a large white and light filled space, you need something to anchor the eye.

Outside in the garden is an old wooden ladder that's beyond weathered! Think old, moss-laden, and perfect for hanging over the table.

"What", said The Bloke. "Hang it where?"

Yep, that's right over the table. He took a little convincing this really was a good idea, but we are both so happy with the finished effect.


Although I admit it did have an inauspicious start.


This is the process we used to hang it. First, if like mine, your ladder is too long, decide how long you want it to be and cut it down to size. As metal ran through our ladder, we used a hacksaw to cut it.


To hand it from the ceiling, we used small link chain from Mitre 10. They had a good range of chains in different size, colours, and finishes. You can view some of their range here . 


After a rough estimate of how low the ladder would hang, we make a loop of chain for each end and sat the ladder into the loops. Be conservative with your estimate it's much harder to try and add links back in, than to remove excess.


To centre it over the table, you could either, hang it and move the table to suit. Or move the table to where it needs to be and then measure and centre the ladder over the table. We went with option two, as we needed our table to stay were it was. 

We used a plump bob to mark the spot on the roof through which to place our hook. This is the process we used.

The plumb bob is a piece of heavy metal with a pointed end, attached to a string.


We decided how far in from either end of the table we thought the chain should hang. Then we measured the centre of the table at that point, using painters tape to avoid marking the surface. 


The Bloke held the string at the roof above the painter's tape, letting the bob hang and slowly moved the string until the bob point touched the centre mark on the table. He was then able to mark that spot on the roof and insert the hook.

     
The plump bob suspended from the ceiling and right over the pencil mark

    
With the plump bob over the correct point mark the ceiling 

We used a plaster board toggle hook to hang the chain from the ceiling. This type of hook is used when you need to hang from the plasterboard rather then screw into the wooden supports in the ceiling. You might do this if the wooden supports are not in the right place for where you wish the ladder to hang.

The toggle hook works like this:

It has three parts, the washer, the toggle, and the hook.


Drill a hole in the ceiling where you marked using the plump bob


put washer over the hook and screw into the toggle. Hold the wings down like this and push into the hole


When it is up inside the ceiling the wings will pop out (like this) and you hear a click. 

Then simply tighten it. The washer camouflages the hole.

We lifted the ladder (already sitting inside the chain loops) and hung the loop over the hooks. I decided to leave some excess so the ladder could be lowered if required. The excess we attached across to the opposite side of the loop.


There you have it. It looks a little bare like this, but as it is Halloween tomorrow, I decided to set the table a day early. The ladder was wound with some cheap vines and a pair of jar lanterns that I received as a gift last Christmas. It would also look great with fairy lights (battery operated). 

If you follow me on Instagram @lifeloveandrenovation, you will have seen a few of my Halloween-scapes already. 


I wanted more of a Day of the Dead feel this year. I would love to hear what you think in the comments section below. 


Have a great week.

    Grace


Monday 24 October 2016

How to build a beautiful and functional built-in book case

What is it we want in our homes?  Apart from the obvious, a roof and walls to keep out the elements (still working on that one), I mean after that. I've been thinking about this over the last few weeks and have come to some conclusions.


  • I'd like to be able to find a pair of scissors without searching every draw in the house. 
  • A place for everything and everything in its place - ideal, but let's face it, not likely to happen.
  • Comfort - yes, definitely
  • Style - one can hope
  • Cleanliness - yes but not to the extreme, I do have a life
  • Beauty - frivolous maybe, but it just makes life more enjoyable
  • My favorite things out where I can enjoy them

I love the idea of minimalism, but not the spirit. I've tried, I really have. If you've read my earlier posts you are my witness. But its just not in me. I love my stuff, I love finding new stuff (second-hand of course), and I love finding new ways to use and display my stuff. At the same time, I don't want to live in utter chaos either.

Miss B is affectionately known in the family as The Rat Baby. She likes to hoard all her things in a big mess in her room, and is appalled at the suggestion of throwing anything out. She remains traumatized by the time she witnessed The Bloke donating some of her toys to a charity shop. She still sheds tears at the re-telling. NEVER allow your child to see you giving their stuff away, think trust issues and expensive psychotherapy.

I suspect Miss B may have inherited her hoarding tenancies from me, as much as I'd like to blame The Bloke. Mind you, I'm not the kind of hoarder that has piles of newspapers from the last 20 years, or anything so extreme. But I do have a healthy amount of possessions, especially books, family memorabilia, and what I call 'bits and pieces'. Things that I love that have no function other than to make me smile when I see them.

So if minimalism isn't for me, what was I to do with all my things? To try and corral some of my possessions into some semblance of control and order, I asked The Bloke to make me a bookshelf.

After our success with both the wardrobe and the garage storage unit, I felt inspired to design a solution that The Bloke could make. I wanted shelving that would be substantial. Something that I could display my favorite things on, but also something to store the not so beautiful, like boxes of tax records.

I am beyond delighted with what we achieved. The shelves are exactly as I imagined them.


I had been looking at behind-the-couch shelves on Pinterest and thought I would combine the two.
From the top of the couch down is storage for business papers, and records that are rarely used, but have to be kept. The couch sits up against the shelves, so this part is not visible, but the sofa can be pulled out to access them if needed. Above are all the things I use regularly, as well as some display room for bits and pieces. 

We made the unit out of MDF board from Bunnings Warehouse.

First we worked out the measurements. I like the look of shelving that has segregated spaces. We planned how tall and wide the space was, and then divided that into three equal vertical spaces and four horizontal spaces from the sofa up. From the sofa down the spaces were made to specifically store various items.


the shelving made from MDF board.


I really wanted a unit that looked built in, and so we used a router to cut grooves in the vertical boards to slide in the horizontal shelves. The post on our wardrobe gives more information on using the router, you can read about it here. We also decided to add thicker 10 by 30 mm fascia to the front of the horizontal boards to give the shelves a nice chunky look. 

fascia added to the horizontal boards.
                        
We punched in the nails and filled the wholes with plaster for a smooth painting finish

hammer and punch tool to knock in the nails.
punching in the nails to just below the surface of the fascia
an example of the nail head punched in 
                           
plaster paste and spreader
plastering over the punched in nail head
filling gaps with polyfiller. We used plan white filler for dry areas about $6 a tube.

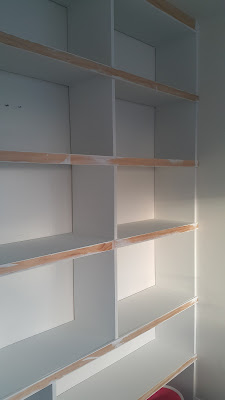
Next it was time to undercoat and paint. Once the undercoat is on, look closely for any more gaps that might have been overlooked prior to painting. Gaps show up really well against the white undercoat.


a small gap overlooked first time around
                          

We decided to fill in the gaps at the back of the shelves to give them a solid look.


And we also decided to add molding to the top to give a more elegant look.


I choose to paint the shelves the same colour as the walls of the room, Resene's Bianca, but used a semi-gloss to make sure the surfaces were easily wipe-able. Two coats of undercoat and two coats of topcoat. I wanted the shelves to blend into the background, rather than to be a contrast against the walls.

I used a microfiber roller and a quality paintbrush for cutting in.


undercoat on 


Adding the final top coat.


The final effect


Before the sofa is in place, ugly boxes on display
Sofa in place...so much better


Once the sofa was back in place and the shelves filled with my treasures, the shelves look amazing. I am so happy with the final result.

This project required a moderate amount of skill. The hardest part is getting the routing grooves even, I recommend practicing this on some off-cuts. Take your time to fill all the gaps and use a good quality paint brush to achieve a smooth paint finish. The brush really does make a difference. We made this over the course of four non-consecutive weekends. The cost was approx $500 for the MDF, fascia and molding, nails and gap filler. We already had the plaster and undercoat. The paint from Resene paints was bought during their annual 30% off sale at $99 for 4 litres. This is way more than needed, but I plan to use the rest on the kitchen when we get to that area.

Let me know what you think in the comments below.


Have a great week.

Grace